27 May, 2026
Bathroom Niche Ideas for Australian Bathrooms
Explore the best bathroom niche ideas for Australian homes. Ditch the wire baskets and create a sleek, built-in shower shelf you'll love.

Video Credit: Bathroom Remodeling Teacher
What Is a Bathroom Niche and Why Australian Bathrooms Need One
Imagine being able to leave the shower area and not having to worry about balancing wire baskets on the shower wall or squeezing shampoo bottles onto the edge of the bath. A bathroom niche can bring you just that.
A niche is set into the wall instead of on to the wall and this is a vital difference to be aware of. A niche works with the area of a wall between studs or cavities and as such the face of the wall itself stays flat as opposed to a built-out, surface mounted type shelf. This is a small design point, perhaps, but one that has real functional significance.
Bathroom niche ideas have moved on to become commonplace across new builds and renovations in Australia. This is especially the case with Australia's inner city bathrooms which are often not of the grand variety. With niche a standard feature in houses throughout Sydney, Melbourne and Brisbane, a niche can reduce clutter and make showering in a cleaner and simpler area a reality.

Types of Bathroom Niches: Recessed, Floating and Corner Designs
Now that you are clear about the general function of the bathroom niche, you also have to know the most probable types.
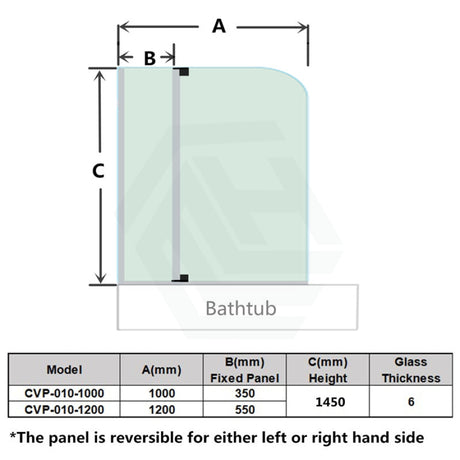
The fully recessed niche is the bathroom niche concept that most homeowners have in mind when thinking about bathroom niche ideas. This style of niche sits flush with the wall surface and is built into the stud frame, typically 100–150 mm deep. The common widths match the spacing between the studs: 450 mm or 600 mm centres. A basic single shelf recessed niche will cost between $300 and $600 supply and install, subject to tile selection and complexity. A single-shelf niche typically adds one to two days to a bathroom renovation timeline.
Corner niches offer an ideal solution for showers where two tiled walls come together within the shower. Shallow, generally 80–100 mm deep, corner niches fit well within compact footprints and make the task of storing daily toiletries easily accessible. The price ranges between $150–$350 for a prefabricated insert, or more for a custom tiled construction.
If you want to accommodate a niche but cannot or do not want to break through the whole of the wall thickness then semi-recessed or floating shelf niches are suitable for masonry walls. These usually project from the wall 50–80 mm and suit areas where minimal structural interference needs to be maintained. They are the least expensive of the three configurations, suitable for use with both porcelain and stone shelf types.

Materials, Waterproofing and Tiling Considerations for Niches
So, now you know the type of niche you want, the most vital considerations are the materials and waterproofing in light of Australian compliance requirements for wet areas.
The best option for shower wet areas is tiled-in niches. A porcelain tile in the niche has lower water absorption than ceramic and better moisture resistance. DW Tile and Everstone stock a good selection of porcelain and stone-look options that can be matched to the surrounding wall tiles. For a feature back wall within the niche, Onix glass mosaics add a bit of interest and depth without distracting from the space.
Another option is to consider acrylic or polymer pre-formed niches, which arrive from the manufacturer waterproofed and slot into place between the studs where they can be tiled over or left as-is. Installation will be quicker and on-site waterproofing work will be reduced, but the design options are fewer.
Here is the part you cannot compromise: all niches within a shower wet area must be waterproofed, including both behind and around the cavity before tiling is completed. NCC 2022 requires this waterproofing extends to a minimum of 1800 mm (NCC 2022, ABCB Housing Provisions, Part 10.2) from the floor substrate and the membrane be applied by a licensed waterproofer. Common mistakes include failing to waterproof the base of the niche, using the wrong adhesive, and not siliconing the joins around the perimeter after tiling. Waterproofing membrane requires 24–48 hours to cure before tiling can begin. Once water gets behind your walls it can cause major issues and repairs are costly.

Sizing, Placement and Installation Planning for Your Niche
Once you have decided on the type of niche and materials, the next important step is to decide on the niche size and position so that it will be functional on a daily basis.
The standard shower niche is generally 300 mm deep by 600 mm wide and recesses approximately 100–150 mm into the wall for a single shelf. When planning the size of your niche, align dimensions to your tile size to avoid unnecessary cuts — your tiler will thank you and you will get a better looking result.
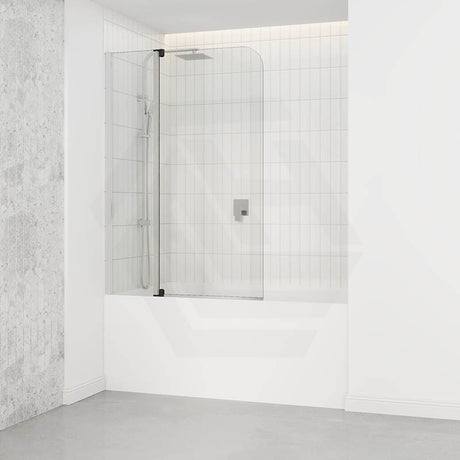
Another key detail that is often overlooked is the height of the shower niche from the floor. Shower niches should generally be 900–1200 mm from the floor — a practical height, within the splash zone and proportionate on the wall. If you are installing the shower niche around over bath shower screens, position the niche on the wall adjacent to the screen so you do not have to reach across the glass to access your products. If you are installing a niche beside a built in bath, position it in the wall at the tap end, approximately 300 mm above the top of the bath to store your bath products.
Your tiler and builder must locate the stud framing before any cutting or opening is done. If you choose to install hardwired LED inside the shower niche, a licensed electrician must carry out the electrical work, which must comply with AS/NZS 3000:2018, include RCD protection and be installed outside Zones 0 and 1. Waterproofing membrane application and tiling within the wet area of a shower must be undertaken by a licensed tradesperson in all Australian states and territories. State and territory licensing requirements must be followed when cutting or drilling into walls near plumbing or electrical services.

Styling Your Niche to Suit the Rest of Your Bathroom
Now that you have made all of the decisions around the structural installation, it is time to think about how you want to finish and style your niche in conjunction with the remainder of your bathroom space.
You essentially have two main directions: choose the same tile as your shower wall for a seamless feel, or choose a different feature tile — such as a mosaic, bold porcelain or textured stone-look tile — on the back wall of the niche. Both options work well and depend on your style and preferred finish. Grout colour also matters. Darker grout feels more intentional and will not show soap scum as readily, while lighter grout creates a brighter, airier feel. A matte or honed tile finish is preferred for shower niches as they are less slippery and show water marks less than polished finishes.
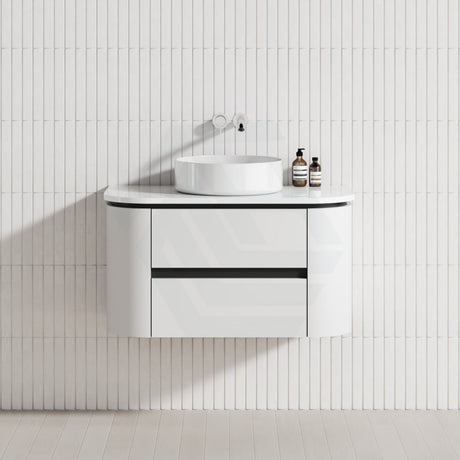
It is important to choose shelf inserts and accessories that coordinate with your vanity finish. If you have chosen a matte black or brushed gold wall hung vanity, it makes sense to carry those finishes through to your niche hardware and shelves. Fienza and Aquaperla both offer coordinating finish ranges for hardware and shelf inserts — a small and considered detail that brings the whole bathroom together.
References
National Construction Code 2022, ABCB Housing Provisions, Part 10.2 Wet Areas
AS 3740:2021 Waterproofing of Domestic Wet Areas, Standards Australia
AS/NZS 3000:2018 Electrical Installations (Wiring Rules), Standards Australia
State plumbing licensing legislation (VBA Victoria; Fair Trading NSW; QBCC Queensland; Building Practitioners Board WA; CBOS Tasmania; ACTPLA ACT; Building & Energy SA; ABPB NT)