03 February, 2026
Bathroom Mold Removal Tips That Won’t Damage Your Bathtub
Remove bathroom mould safely without damaging tubs: Gentle methods for acrylic, enamel & stone using vinegar, baking soda or tea tree oil. Step-by-step removal, plus ventilation fan tips to prevent regrowth & maintain fresh spaces.

Mould in the bathroom is one of those things that seems to sneak up on you. One moment your tiles are fine, the next you discover that a black patch is creeping through the grout. Sound familiar? So you drained your bank account and purchased the most amazing house, but did you stop to think about what could come next? You’re paying the bills monthly for everything else — there’s not a dime left when … perhaps you notice something black swirling down into the drain of your tub or sink. And it’s not just plain ugly (though it is) — it’s also psychologically corrosive for your family. But that’s the really annoying part because I see apartment dwellers who are eager to kill mould with anything systemically toxic they can get their hands on – while at the same moment – they will power sand /abrasize their bath.
That’s what we’ll discuss today. And when it comes to banishing mildew, you needn't be knocking your bath down. Trust me on this one.

Understanding Your Bathtub Material
But before you pull open the cabinet under your sink to search for that bottle of industrial-strength cleaner, there’s something you should know: material matters. What is your bathtub made of. This is important.
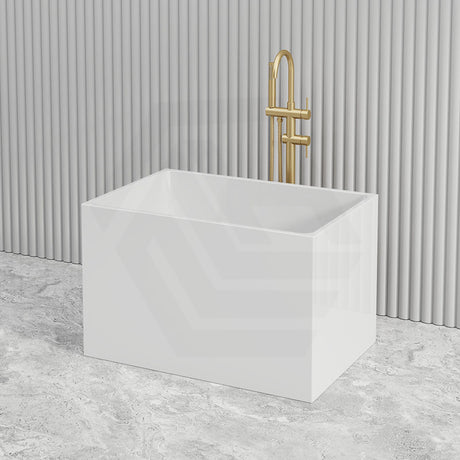
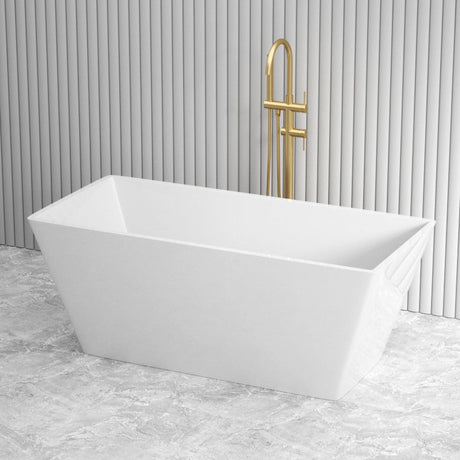
Acrylic Baths
You can find acrylic baths in plenty of Australian homes. They’re lightweight and relatively inexpensive, with excellent heat retention. But there’s a catch: They scratch easily. I’d say a good 50 per cent of acrylic baths I’ve encountered in people’s homes have not died through old age or wear and tear, but from someone scrubbing its essential life out with one of those beastly scouring pads, trying to shift some mould. Each time you scratch an acrylic surface, you’re creating all these little grooves which the mould loves to snuggle into.
Then come your enamel-coated steel baths — the old-fashioned type that nine out of ten times were to be found in your nanna and grandpa’s bathroom. In some ways they are more rugged than acrylic even, but the enamel is chippable if you do things like abuse it with metal scrapers and strong acids. And solid surface baths? They are a high tech compound and very strong but common sense must prevail. Stone baths fall into this bracket also — they're grand and made of lovely natural stuff, but if you want to keep them gleaming with newness, there is some TLC involved.
When it comes to an unfair fight, bathroom mould isn’t going to have you running for the nuclear cleaning supplies. Really. I understand that the urge to just grab something industrial strength from under your sink and cut that black gunk off in one sweep is overwhelming when faced with black stuff crawling up the sealant, however, more often than not there are gentler alternatives and way better results, not to mention in this case then you’re not staring at the presumed cost of a new bath.

Natural Cleaning Solutions
White vinegar is great for bathroom mould in fact. I was dubious at first — surely it couldn’t be that simple, I thought — but it does. And best of all, it won’t harm any material on your tub.
Here’s what you do: buy a spray bottle, fill it with white vinegar get all up in those mouldy crevices. You want that sour slam. Then — this is where the patience thing comes in: Let it be for at least an hour, but longer if you can manage. You’re going to want to scrub it off as soon as you open.” (But avoid getting finger matter on top here.) Let the vinegar work.
After one hour, with a soft cloth or sponge to wipe off the mould. There will be some stubborn spots where you may find it necessary to reapply a second spritz-and-wait. If you’re one to mind the smell of vinegar, while working with it the smell does get pretty strong, but it fades quickly when you rinse. If it’s annoying you, open a window.
Baking soda is also great, particularly if you add a bit of water to make it into a paste. I also love that this performs well on solid surface baths, since you can really rub the paste into your trouble areas without fear of scratching. In addition, the mild polymer nature of baking soda can help pull off the mould as well and it’s soft enough so that does not scratch surfaces. It also eliminates odours, which certainly is a plus.
Another alternative is tea tree oil applied in water. Fill a bottle with water, add 10 to 15 drops of tea tree oil, and lightly spray any mouldy areas; let it sit. No rinsing required. Tea tree oil is naturally antifungal as well, and it smells a whole lot better than those other chemical cleaners. It’s not but it lasts forever.
Tackling Stubborn Mould Stains
Yes, occasionally you get the live growth and then a mould that’s been there for ages and so leaves a stain even after the live part is gone. This is the moment when people panic, and start plowing money into bleach. I’m not here to tell you that bleach doesn’t work — it does. But be careful how you use it, particularly in the bathtub.
If you’re using bleach, don’t forget to water it down. That’s one part bleach to 10 parts water, not the other way around. Brush the paste onto the stained area, leave it on for 10 minutes or so and then rinse thoroughly. Make sure your bathroom is ventilated.
I do have one criticism of bleach, and that is that it’s abrasive. And while it’s not going to destroy your tub the first time you use it, over time, it can cause discoloration — especially in coloured or patterned tubs. I have witnessed splendid vintage pink tubs grow splotchy and mournful after one too many bleachings. So, if you’ve parted with the cash for a really, really nice bath — one of those lovely natural stone numbers that will be attached to your house forevermore, or some high-end acrylic lads even — then of course you wants to take care of it.
Less harsh than stain remover, hydrogen peroxide. “It does the same thing bleach does if you want your whites to be whiter, but it is much more hard-core on conditions. Spray on, let sit for 30 minutes and wipe away. The best part is that it’s excellent for grout and sealant stains on the bath edge.

Prevention Tips
Mould is persistent and will return, unless you create an unliveable bathroom for it.
One of the best things you can do is to improve ventilation. Run the exhaust fan for at least 20 minutes after you shower or bathe. Believe me, I know how easy it is to forget and annoying as hell, but damn does it go a long way. If not, crack a window open. Let that moisture out of your clothes, and don’t allow them to tumble all over everything.
Clean your bath after use. A squeegee or towel wipe takes 30 seconds and protects against water build-up, which can lead to mould. Make it something you would do as part of your regular routine, like brushing your teeth. This is particularly critical if you have solid surface baths or natural stone finishes, as these can watermark and stain when water is left standing on them.
Check your bathroom sealant regularly. You can see this on the little bit of silicone or caulk that goes around the edge of your bathtub, as mould tends to start in there, simply because it’s always wet. So, if your seal is looking dodgy – dirty, peeling, cracked and / or permanently mouldy, it’s time to get that out of there. That new sealant will make all the motoring in the world of difference and it is not bad at all. You can even purchase mould-resistant grout from Bunnings which is made to have this growth.

The Australian Bathroom Perspective
Wet bathroom design with floor drain and tiles on the wall form a drain is at the heart of how we can get such an open pan gorgeous shower, without all the downsides that go along with it. There are lessons here for Australian homes cursed with damp problems.
In standard Australian housing, showers are enclosed with a door too that avoids water from getting on walls therefore complete waterproofing and tiling is not required like many other countries. It can also cause more mould when that moisture gets stuck in places where it’s harder to reach.
When to Call the Pros
If your house has a mould that is returning and you can rub as long as you like but it doesn’t go away or, there seems to be more than just surface mould in plain view to the naked eye then there might be a potential greater moisture problem at hand that needs addressing.
But if the mould’s ruined your tub — it has left pitting, discolouration you can’t shift or has roughened the bath surface — then you may have to resort to professional refinishing, or replacement. It’s a bummer, but you might spend more in the long run if you try to DIY your way out of real damage.
Black mould (Stachybotrys) would also be one where I’d bring in professionals to assess. The type of mould you’re dealing with, if it’s dangerous or not and its location can affect whether the mould you’ve found is a danger to your health.

Final Thoughts
So, you don't have to tear out your bathtub just because of a little bathroom mould. Give softer and natural methods a try, keep good ventilation in check, and take prompt action at the first signs of moisture problems. Whether you sprung for a no-frills acrylic number or went all out on what’s less of a shower and more an indulgent spa retreat, natural and gentle cleaning tricks will keep it lookin’ shiny and new(ish).
Mould has no place in a room like the bathroom, and things get even worse once you let it get out of control. Regular wiping, ensuring great ventilation and being proactive about moisture issues now will save you hours of scrubbing in the months ahead (and keeping that bathroom looking gorgeous years down the line). Your bathroom — and tub! — will be grateful.