19 January, 2026
How to Attach an Undermount Sink: Complete Guide
DIY undermount sink installation: Step-by-step guide with tools, clips, silicone sealant & supports for secure, seamless fit. Fix common issues & maintain for leak-free longevity.

Installing an undermount sink can give your countertop a clean, seamless look. The sink sits under the bench, so everything looks tidy and modern. But because it’s mounted from below, the sink needs strong support and careful sealing to stay secure and leak-free.
This blog will cover the full process from start to finish. We explain what an undermount sink is, what tools and materials to prepare, and how to attach undermount sink step by step. We also go through common problems people run into and how to fix them, then finish with simple care tips to help the sink stay solid and looking good over time.

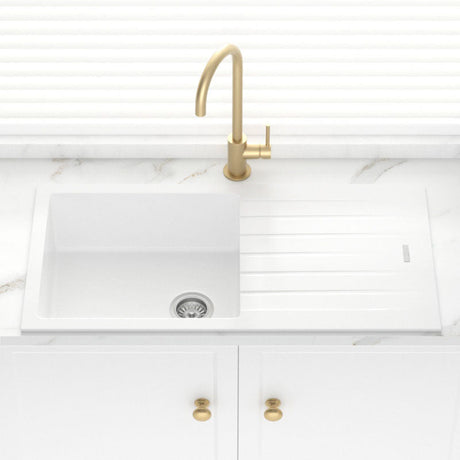
What Is an Undermount Sink?
An undermount sink sits under the countertop instead of dropping in from the top. The sink edge is hidden under the bench, so the surface looks smooth with no raised rim.
Compared with a top-mount sink, an undermount sink looks cleaner and leaves more visible bench space. It also makes cleanup easier. Water, crumbs, and spills can be wiped straight off the countertop and into the sink without catching on a lip.
Common types include single-bowl undermount kitchen sinks for big pots and pans, and double or triple bowls for keeping tasks separate, like washing and rinsing. Bathroom versions are made to fit vanities and smaller spaces.
Undermount sinks come in stainless steel, granite, clay, ceramic, or copper. A strong countertop is important, so these sinks are usually installed with stone surfaces like quartz, granite, marble, or engineered stone.

Tools and Materials You Need for Attaching an Undermount Sink
Installing undermount sink needs careful fitting and strong support. Having the right tools and materials helps prevent leaks, avoid damage, and keep the sink secure.
Tools required:
- Pencil, tape measure, and utility knife
- Screwdrivers (flathead and Phillips)
- Caulking gun
- Jigsaw
- Soft cloth
- Sandpaper
- Safety goggles
Materials required:
- Undermount sink
- Silicone sealant
- Mounting brackets
- Denatured alcohol
- Scrap wood
How to Install an Undermount Sink Step by Step
Once you gather all your tools and materials, the installation process becomes much smoother and more manageable. Let’s walk through the installation of how to fit an undermount sink from start to finish.
Step 1. Prepare Before Replacing an Undermount Sink
If this is a remodel, the old sink needs to come out first. Turn off the water supply completely and disconnect the water lines and drain underneath the sink.
Use a utility knife to cut through the old sealant around the sink edge. Remove any mounting clips holding the sink in place. Gently use a pry bar to loosen the sink from the countertop, then lower it carefully and take it out.
Once the sink is removed, clean the underside of the countertop. Scrape off old adhesive and sealant, then wipe the area with denatured alcohol. Make sure the surface is clean, dry, and free of residue before moving on.
Step 2. Position the Undermount Sink
Place the new undermount sink into the countertop cutout to check fit and alignment. Make sure it sits evenly, with the drain centered and spacing balanced on all sides. The countertop cutout will act as the main guide for positioning.
Use a pencil to lightly trace the sink outline on the underside of the countertop as a visual reference, then remove the sink.
Step 3. Apply Adhesive
Turn the sink upside down on a soft cloth to protect the finish. Apply a thick, even bead of 100% kitchen and bath silicone sealant around the entire sink rim.
Before setting the sink, wipe the countertop cutout edge again with a soft cloth and denatured alcohol. Dry-fitting can leave dust, fingerprints, or grease, and silicone will not bond well to a dirty surface. Allow it to dry fully.
Step 4. Install and Support the Sink
Carefully lift and position the sink back into the cutout, using the countertop opening and reference marks for alignment. Press firmly to seat the sink into the silicone. Make any final adjustments before the sealant begins to set.
Install the mounting brackets or clips according to the manufacturer’s instructions. Tighten them evenly to hold the sink in position, but do not rely on them alone to support the weight.
Support the sink from below using adjustable sink supports, a sink installation kit, or temporary bracing such as 2×4 lumber wedged between the cabinet base and the sink. This support must stay in place while the silicone cures to prevent sagging.
Step 5. Final Touches
If excess silicone squeezes out around the edge, wipe it away immediately using a soft cloth. A small amount of mineral oil on the cloth can help create a clean, smooth finish.
Leave the sink supports in place and allow the silicone to cure for at least 24 hours (or longer if recommended by the manufacturer). After curing, remove the supports, reconnect the plumbing, and resume normal use.

Quick Fixes for Common Problems When Fitting Undermount Sink
Even with careful installation, under-counter basins can present issues that need fast, effective solutions. Knowing how to handle these problems can prevent bigger headaches down the line. Below are some quick fixes for typical challenges.
1. The undermount sink is leaking.
Check whether the connections between the sink and the plumbing are secure. If any joints are loose, apply silicone sealant around the drain opening using a caulking gun, then smooth it out with a damp cloth.
Also inspect whether the sink is fully bonded to the countertop. If gaps are found, tighten or reinforce the mounting clips.
2. The sink is not level or looks uneven.
Check the mounting clips to see if they are tightened evenly. Loosen them slightly, adjust the sink until it sits level, then retighten the clips one by one.
Make sure the sink is properly supported from below while you adjust it. Uneven support can cause the sink to tilt over time.
3. The sink is sagging or pulling away from the countertop.
This often happens when the sink is not supported while the silicone is curing. Add firm support under the sink right away, using adjustable supports or wooden braces inside the cabinet.
Tighten the mounting clips evenly. If a gap is already visible, remove the sink, clean off the old silicone, and reinstall it with fresh sealant and proper support.
How to Maintain the Undermount Sink
Installing the sink is only the first step. A little regular care helps prevent leaks, stains, and wear over time, especially around the join under the benchtop.
- Clean the sink and surrounding countertop often with a non-scratch cleaner.
- Wipe away water after use, so mineral marks and grime don’t build up.
- Check the seal where the sink meets the countertop from time to time. Reapply silicone if you see gaps, peeling, or leaks.
- Avoid dropping heavy items into the sink, because the bowl or the mounting can crack or shift.
Conclusion
Installing an undermount sink takes care, patience, and the right setup. Once you understand the steps, the job feels far more manageable. We’ve covered everything you need to know about how to attach undermount sink, from preparation and installation to fixes and upkeep.
Taking time with sealing, support, and curing helps the sink stay secure and trouble-free. With the right approach, an undermount sink can look great and work well for years. For more home improvement guidance and quality solutions, explore MyHomeware.