If your faucet is leaking, old, or just not working, you can change it yourself. With the right tools and simple steps, it’s a job most people can do. In this guide, we’ll show you how to charge a shower faucet. You’ll see what tools you need, how to do each step, and the common mistakes to avoid. We’ll also explain when it’s better to call a plumber. Let’s get started!

Tools and Materials You Need for Changing Shower Taps
Before learning how to change the faucet in the shower, let’s explore what kinds of tools and materials you’ll need. It will make the process smoother and prevent unnecessary delays.
Essential Tools
- Adjustable wrench: For loosening and tightening faucet connections.
- Screwdrivers (flathead & Phillips): To remove handles and faceplates.
- Allen key set: Often needed for handle removal on certain models.
- Plumber’s tape (Teflon tape): To ensure watertight seals on threaded connections.
- Bucket or container: To catch any residual water during removal.
- Utility knife: For cutting away old sealant or caulk.
Recommended Materials
- Silicone sealant: For sealing around trim plates to prevent leaks.
- Cleaning cloths: To wipe away debris and water before installation.
- Lubricant (plumber’s grease): To help with smoother assembly and to avoid corrosion.
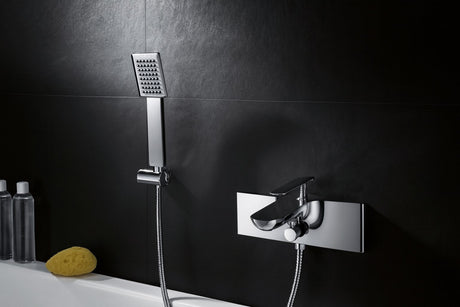
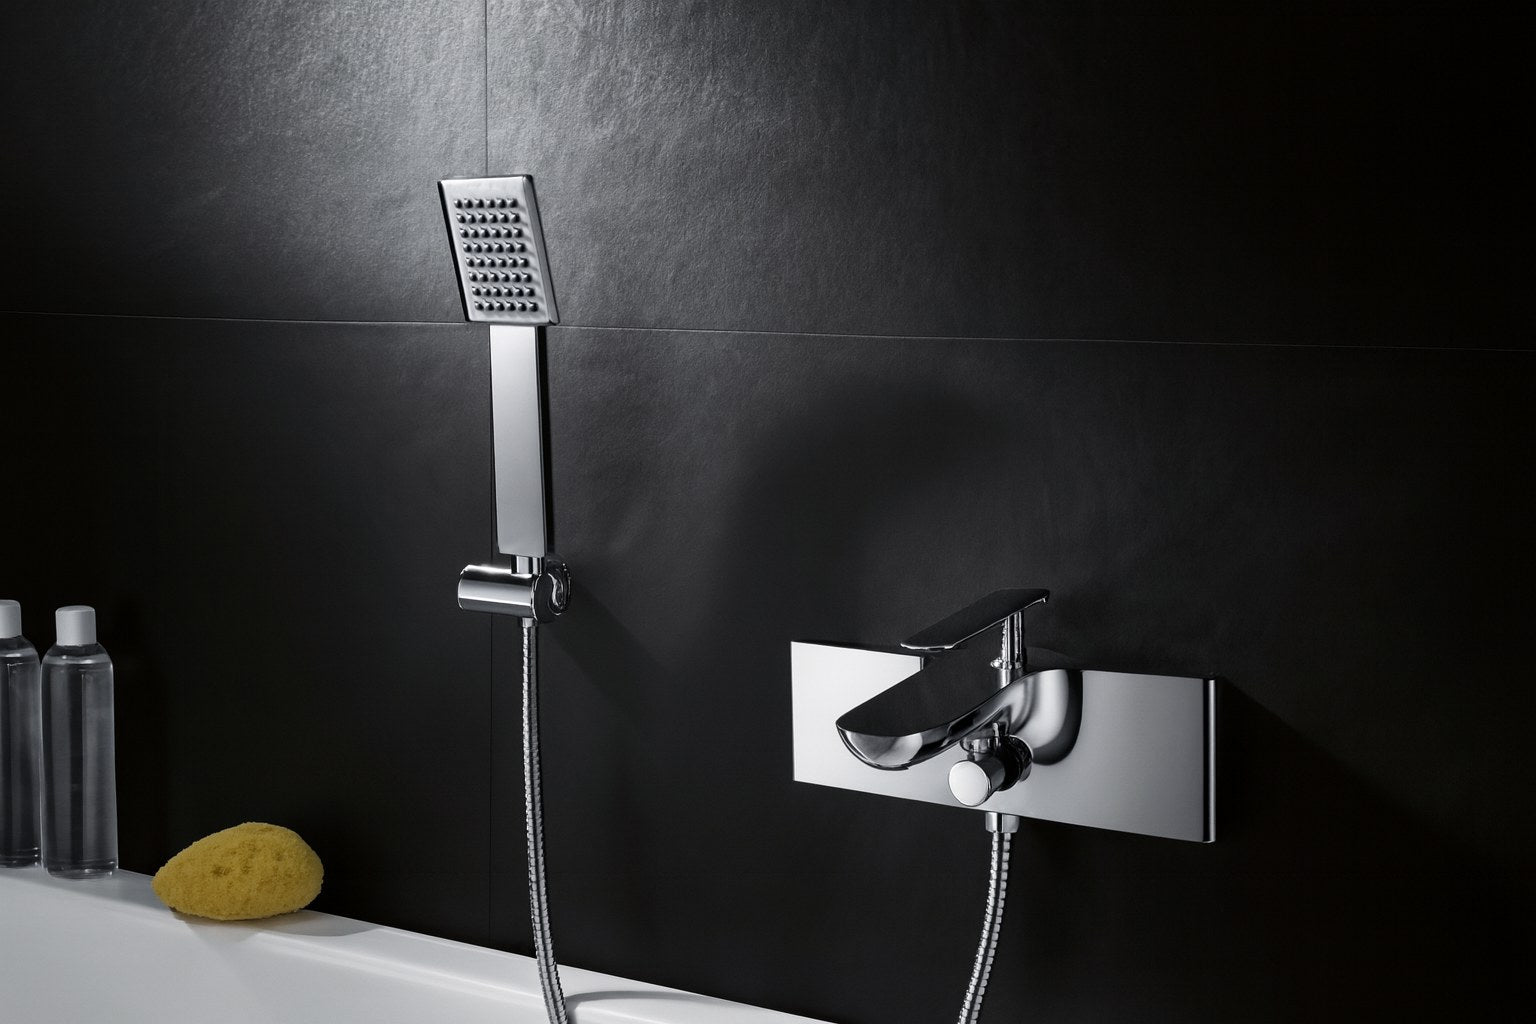
- New Shower Faucet Kit: Select a compatible shower faucet kit to match your bathroom design. A convenient place to find everything, whether it’s shower taps, shower head replacement, or shower rods, is MyHomeware. All products meet Australian standards and are available for delivery nationwide.

How to Replace a Shower Faucet Step by Step
How do you replace a shower faucet after gathering all the required essentials? Here’s the step-by-step guide for your reference.
Step 1. Turn Off the Water
This is the most important step for safety. Locate your home’s main water valve or the dedicated shut-off for the bathroom, then turn it off completely to prevent leaks or flooding while you work.
Step 2. Remove the Old Faucet Handles
Then remove old parts. Use a screwdriver or Allen key to loosen the screws holding the handle in place. Gently pull the handle off. If it’s stuck, wiggle it slowly to avoid damage.
Step 3. Remove the Faceplate and Showerhead
Once the handles are off, you’ll see a faceplate (escutcheon) that covers the hole in the wall. Take off the faceplate by carefully removing its screws. You may need to use a utility knife to carefully cut through any old caulk or sealant around the edges.
Step 4. Remove the Showerhead
Unscrew the showerhead counterclockwise. If it’s too tight, use an adjustable wrench, but be sure to wrap a towel or rag around the showerhead to protect its finish from scratches.
Step 5. Prepare the New Faucet
Get your new faucet parts prepared by wrapping plumber’s tape around the threaded connections. This helps create a watertight seal, preventing future leaks. Never skip it.
Step 6. Install the New Valve Trim
Position the new valve in place and tighten the fitting securely. Depending on your new faucet, the exact steps of how to install a shower faucet can vary. So, always refer to the instructions that came with your new kit. Then, secure the trim plate back onto the wall, applying silicone sealant around the edges to keep water from seeping behind it.
Step 7. Test and Seal
Once everything is installed, it’s time to check for leaks and finish the job. Slowly turn the water supply back on. Test the faucet for proper water flow and check for any leaks. If you spot drips, tighten the fittings slightly.

Common Mistakes to Avoid When Replacing a Shower Faucet
Knowing common mistakes before starting your tasks can save time and effort. It’s a necessary part of how to change shower fixtures properly.
1. Not Turning Off the Water Supply
This is the most critical step for safety. Forgetting to turn off the water can lead to a huge mess and water damage. Before you unscrew anything, always turn off the main water valve to your home. Then, open a faucet on a lower level (like a sink) to drain any remaining water from the pipes and relieve pressure.
2. Buying the Wrong Replacement Parts
Not all faucet parts are interchangeable, even if they look similar. A new handle or faceplate from a different brand will likely not fit the existing valve in your wall. Look for a brand name on the faceplate or handles. This will help you find a “trim kit” that is made specifically for your existing valve. You can also take a picture of your old faucet from the front and side for reference.
3. Not Using Plumber’s Tape
Plumber’s tape (also called Teflon tape) is a simple and inexpensive material that is essential for a leak-free connection. It creates a tight seal that prevents drips and leaks. Without it, water can slowly seep out of the threaded joints. Always wrap plumber’s tape clockwise around the threads of every screw-on connection.
4. Over-Tightening Connections
Overtightening can strip the threads on plastic or metal parts, leading to leaks and a broken fixture. To avoid it, you can first tighten by hand; then, use a wrench for a final quarter or half-turn. Stop immediately once you feel strong resistance.
5. Not Sealing the Faceplate
The faceplate (escutcheon) covers the hole in the wall, but it also has an important job in preventing water from seeping into the wall behind the tiles. After you’ve installed the new faceplate, apply a thin bead of silicone caulk around the top and sides. Leave the bottom un-caulked. This allows any water that gets behind the plate to drain out instead of getting trapped in the wall.
6. Losing Small Parts
Tiny screws, washers, and O-rings are easy to drop, and a lost part can bring your project to a complete halt. Place a towel or rag over the drain before you begin. This will catch any parts that slip from your hands, keeping them safe and easy to find.
When Should You Consider Hiring a Professional?
While learning how to change a shower faucet can be a rewarding DIY project, there are situations in which a licensed plumber is required.
- Complex Plumbing Layouts: Replacing the faucet may require specialized tools or skills for homes with older or unusual pipework.
- Hidden Leaks or Water Damage: Signs of mold, damp walls, or persistent drips could indicate deeper issues that need expert repair.
- Valve or Pipe Replacement: If the job involves cutting into walls or replacing major components, professional precision can prevent costly mistakes.
- Time Constraints: If you can’t afford trial-and-error delays, a pro can complete the work quickly and correctly.
- Local Code Compliance: Some areas require plumbing work to meet specific regulations. A licensed plumber knows them better and can work accordingly.
Conclusion
Changing a shower faucet is not as hard as it may seem. With the right tools, simple steps, and some patience, you can do it yourself. This guide will take you from start to finish. You’ll learn how to prepare, how to avoid mistakes, and how to change a shower faucet with confidence. If any step feels unclear, you’ll also see when it’s better to call a plumber. For good shower faucets and accessories that make the job easier, you can check MyHomeware. It’s a simple place to find what you need for your bathroom projects.
FAQs
Is It Easy to Change Shower Taps?
Yes, it can be. If you have simple tools and follow the steps, changing surface taps is not too hard. But if the valve is hidden or the pipes are old, it’s safer to call a plumber.
Do I Need to Shut off the Water to Change a Shower Faucet?
Yes, you must shut off the water before changing a shower faucet. This prevents leaks, water damage, and accidental spraying during removal or installation.
Are Shower Faucets Universal?
No, they are not. The faucet must fit your plumbing, and valve. Always check the details before buying so the new one matches your setup.
How much will a plumber charge to replace a shower valve?
The cost depends on the job and where you live. Most plumbers charge $80 to $200 per hour. There is also a call-out fee, which can be $60 to $250. If the wall needs to be opened or the valve replaced, the cost can be higher.